Updates from January, 2006 Toggle Comment Threads | Keyboard Shortcuts

  • Urban 14:56 on 27 Jan. 2006 Permalink |  

    UWB je the name of the game 

    Na Registru berem, da BlueTooth še zdaleč ni dead.

    Vse se vrti okrog zastavljega cilja Bluetootha, ki je “visoke hitrosti na kratke razdalje”, in na kratkih razdaljah bodo Ultra-Wide-Band tehnologije (ki bodo nazaj kompatibilne z Bluetoothom), dosegle hitrosti do pol Gbps, morda še več.

    WiFi pa v nasprotju s tem teži k povečevanju dometa, kar vodi v neizbežno interferenco in manjše hitrosti. Ker je vsak user preveč egoističen in bi se se rad čimbolj oddaljil od dostopne točke, s tem trči ob interese drugih userjev in vsi so na slabšem. V članku to primerjajo z avtomobilsko industrijo, kjer si vsak lastnik želi čim hitrejšega avtomobila, potem pa se zaradi gužve, ki jo delajo drugi, vozi po mestih počasneje, kot bi se z biciklom.
    Na obzorju so tenologije, ki bodo še (okrog 2x) povečale domet WiFi-ja, s tem pa bo situacija še slabša.
    Za to obstaja rešitev – Mesh. Povezovanje dostopnih točk med sabo po zraku. Tako ni treba, da tvoja mreža seva v radiju 200m, dovolj je, če lahko do svoje dostopne točke prideš čez mreže drugih uporabnikov. Mesh tehnologija je že izpopolnjena, edina stvar, ki manjka, pa je standardizacija.

    V članku napovedujejo preobrat, ki ga bo sprožila zakonodaja: prej ali slej bo nekdo omejil uporabo vse močnejših dostopnih točk na tiste, ki so hkrati ponudniki dostopa do interneta. In takrat bodo tehnologije kratkega dosega prevzele štafeto.
     
  • Urban 03:03 on 20 Jan. 2006 Permalink |  

    Creating false-color IR images 

    What is false color?

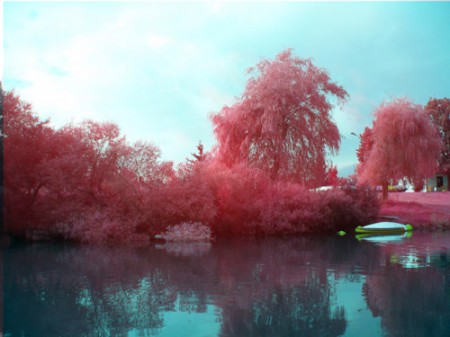
    With false color I’m referring to what Kodak EIR Ektachrome film does. This means, that the IR part of the spectrum is represented with red color, the red part of the spectrum is shown in green color and the green part in blue color.

    This means that the mapping of channels changes from (red → red, green → green, blue → blue) to this:

    IR → red
    red → green
    green → blue
    blue → discarded

    More information on how to shoot in IR.


    What does it mean?

    It means you have to take 2 images for every false-color shot.
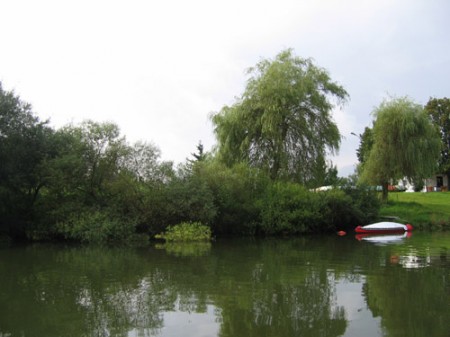
    One has to be in IR and the other one in visible light. They have to be perfectly aligned, so the camera shouldn’t move between shots. It’s best if you use a tripod.


    Image in visible light


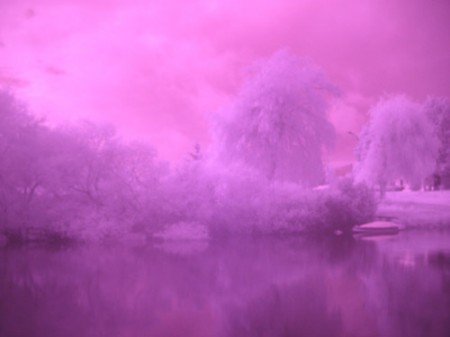
    Image (same scene) in IR


    Then what?

    Next, you have to combine both shots in Photoshop (or some other program), replacing the channels like shown above.
    Before that, I used Auto Levels to equalize the IR image;


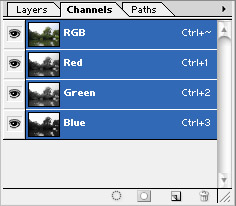
    Channels in Photoshop


    Remapping channels

    You have to start from the back though — first you have to select only GREEN channel, copy the “green part” of the image, select BLUE channel and paste “green part” into it.
    Next, select RED channel, copy the image and paste it into GREEN channel.
    Finally, select your IR image, copy it, then select only the RED channel of the visible light image and paste the IR image into it.

    You should get something like this:

    False-color imitation of Ektachrome

     
  • Urban 02:11 on 15 Jan. 2006 Permalink |  

    Shooting in IR in 5 easy steps 

    1. Select an appropriate camera

    I used Canon PowerShot A80, when I incidentally discovered that its IR blocking filter passes quite some IR to the CCD.

    Check if your camera “sees” IR with a TV remote control. It should look like this:


    2. Get an IR-passing, visible-light-blocking filter

    You can buy quite some of them (Cokin, Hoya), but I chose another way and made one myself from overexposed & developed film. I cut two tiny pieces from the end of some of my old filmstrips (there always is some overexposed slack at the end).
    I used two layers of film (just to make it completely block visible light) and made an improvised IR-passing lens-cap for my camera.
    Another test with the remote control showed that overexposed and developed film is virtually transparent for IR.


    3. Get outside

    Sun is probably the strongest IR illuminator you can afford. Sunlight decreases the exposure times and your pictures end up less grainy.


    4. Take pictures

    It needs some experimenting to get the optimal exposure and focusing. At least in my case, where my DIY filter probably blocked some parts of IR spectrum as well – the image on the LCD was very dark and I had to focus manually by feel.


    5. Postprocess

    All pictures have a strong violet tone, like this one:

    With some postprocessing (Auto Levels in Photoshop), you can make it look like this:

     
  • Urban 17:35 on 6 Jan. 2006 Permalink |  

    Nikon 

    Pravkar sem našel kompakten fotkič z WiFi-jem

     
c
Compose new post
j
Next post/Next comment
k
Previous post/Previous comment
r
Reply
e
Edit
o
Show/Hide comments
t
Go to top
l
Go to login
h
Show/Hide help
shift + esc
Cancel