Updates from November, 2012 Toggle Comment Threads | Keyboard Shortcuts

  • Urban 11:00 on 17 Nov. 2012 Permalink |  

    Least popular 192.168 networks 

    Having a home VPN server on the default 192.168.1.0 subnet is a pain due to address collisions. Indeed, if I haven’t bothered to change it before, why should I expect a random cyber cafe/hotel/company or anyone at all to use a different default subnet?

    So I’ve decided to renumber my home network. But first, I wanted to find a 192.168.x.0/24 subnet with the lowest popularity, so I could minimize the potential collisions.

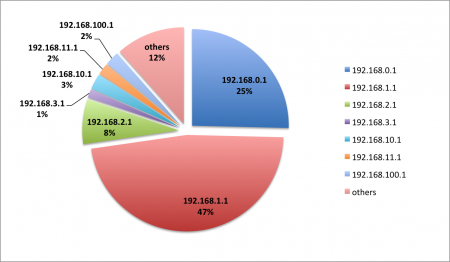
    I asked Google1, querying all the default gateways2 of the form “192.168.x.1”, and got the following result (x axis is the number of Google results, in log scale). Click to enlarge.

    Keep in mind that the Google AJAX search API used here returns somewhat strange numbers, which are by a factor of 10 lower than in plain old desktop Google search, but at least that factor appears to be consistent (I checked the first 10 IPs).

    In fact, the data here is not intuitively comprehensible. The pie chart below is better, showing that anything except the 7 subnets in the legend should give you a sufficiently low probability of collision (lower than 1%). Click to enlarge.

    Note: all data as of Nov 14 2012. Here’s the raw dataset.

    But renumbering the network is a lot of work, really, so maybe I should just pick something from the 10 or 172 subnets. These seem to be much rarer (especially 172). Of course I’d have to retrain my muscle memory.

    There’s other options as well, but I don’t find them very practical. For example, using a 1:1 NAT to provide additional address mapping to VPN users just complicates the network, not to mention firewall rules. And using static client side routes is another non-option, since it can’t be used on locked down devices, such as  iPhones and iPads. So renumbering it is.


    1. I used Google AJAX Search API, stuck the URL into a Ruby script and iterated from 0 to 254 []
    2. I made two hopefully reasonable assumptions, namely that the network popularity is proportional to the amount of people talking about its default gateway, and that the default gateway is has the .1 address []
     
  • Urban 02:01 on 9 Jan. 2012 Permalink |  

    Some notes on Nexenta/ZFS 

    So far I’ve been pretty satisfied with my Nexenta setup. Dedup is a great feature and I’ve rsynced all other computers to it without a single thought of which files are copied more than once (all Windows and program files, multiple copies of pictures, multiple copies of Dropbox dirs, etc.). However, the following three things drove me nuts; here’s a word on how I’ve resolved them.


    Smbshare vs. Samba

    Yes, native ZFS smbshare is great; it even exposes snapshots as “Previous versions” to Windows boxes. And it can be simply managed from napp-it. However, smbshare won’t allow you to share the file system’s children 🙁

    Here’s how this works: let’s say you have 3 nested file systems:

    • mypool/data
    • mypool/data/pictures
    • mypool/data/pictures/vacation

    When you share mypool/data and navigate to it, you won’t see the pictures dir. When you navigate to pictures, you won’t see the vacation dir.

    It drove me crazy and it seems it won’t be supported anywhere in the near future. That’s why I disabled smbshare completely and installed plain old Samba. Because Samba’s not ZFS-aware (but instead a plain old app that accesses the file system) it shares everything as you’d expect. Problem solved.


    Backing up an entire zpool

    I wanted the following:

    • to backup the entire data pool to an external USB drive of the same capacity (2TB)
    • a solution that would be smart enough to recognize matching snapshots and only copy the diffs
    • it should also delete the destination snaps that no longer exist in the source pool
    • it wouldn’t hurt if it supported remote replication in case I wanted that later

    Much has been written about the awesomeness of zfs send | zfs receive, but I was immediately disappointed by all the manual work that still needed to be done. Sure, it supports recursive send/receive, it can be used over ssh, but it only operates on snapshots. It can incrementally copy the last delta (if you tell it exactly which two snapshots are to be used for diff), but if you prune your old snapshots to save space, it won’t know anything about that. So your backup size will grow indefinitely, constantly appending more data.

    What I wanted was a simple 1:1 copy of my pool to an external drive. I even considered adding the drive to the mirror to create a 3-way mirrored pool; once resilvering would complete, I could split the mirror and disconnect the USB drive. However, resilvering is not that smart and takes days; all the data needs to be copied every time, and making a snapshot interrupts and restarts the process.

    Then I found the excellent zxfer. It does work on Nexenta and allows you to mirror an entire pool; the procedure is pretty straightforward: first determine the path of your external USB drive using rmformat:

    #rmformat

    1. …
    2. Logical Node: /dev/rdsk/c3t0d0p0
    Physical Node: /pci@0,0/pci103c,1609@12,2/storage@3/disk@0,0
    Connected Device: WD 20EADS External 1.75
    Device Type: Removable
    Bus: USB
    Size: 1907.7 GB
    Label: <Unknown>
    Access permissions: Medium is not write protected.

    Then create your USB drive backup pool:

    zpool create Mybook-USB-backupzpool /dev/rdsk/c3t0d0

    Finally, recursively backup your entire data zpool (here we set the target to be compressed with gzip-5 and deduped with sha256,verify)

    zxfer -dFkPv -o compression=gzip-5,dedup=verify -R sourcezpool Mybook-USB-backupzpool

    On subsequent runs it identifies the last common snapshot and copies only the diffs. [-d] switch deletes pruned snapshots from the target pool. For more, read the zxfer man page.


    Virtualbox

    This has been pretty disappointing; it’s a pain to set it up and it performs badly (that is, compared to VmWare on similar hardware). It burns around 15% of the CPU running an idle and freshly installed Ubuntu box. Command-line config is a pain and virtualizing (P2V) certain Windows boxes spits out errors that (according to Google) noone has ever seen before. The same image Just Works ™ under VmWare.

    Nonetheless, it’ll have to do for now. For more info on how to set it up, consult the following:

     
    • Gea 23:33 on 12 Jan. 2012 Permalink

      about SMB
      There are efforts to solve this problem.
      Currently: Each ZFS dataset is completely independant from others. You can set a mountpoint to mount the logically below others. But you cannot SMB browse between because they cannot inherit properties.

      Workaround: use one share

      about zfs send
      the target does not increase. its always an exact copy of the source including all volumes and snaps. Transfers are based on modified data blocks so its more efficient than file based methods

      About Virtialbox
      Why do you try to virtualize on top of OS when you need performance. Use a barebone virtualizer like ESXi instead and virtualize all OS’s including a ZFS NAS/SAN
      look at napp-it all-in-one

    • Urban 15:58 on 15 Jan. 2012 Permalink

      Hey, thanks for your elaborate comment.
      Regarding SMB, I think Samba is a pretty decent workaround as well; as far as I can tell, all you lose is “previous versions”.

      About zfs send: my understanding is that only the diff between two snaps is sent, while older snaps are left intact (I did in fact check that).
      Let’s say I have a weekly snapshot schedule and only want to keep 5 snaps. After a snap, I also send the incremental diff to the USB drive. In week 5, I still have two identical filesystems. However, in week 6 I make snap6 and destroy snap1; then I send delta (-i) between snap5 and snap6 to external drive. Now drive 1 has snaps 2-6 and drive 2 has snaps 1-6. This is not what I want, since drive 2 grows in size compared to drive 1. 

      Regarding Vbox: thanks for the tip, I’ll definitely try the all-in-one solution.

    • jaymemaurice 06:01 on 22 Dec. 2013 Permalink

      Old post – but you also lose out on a great multi-threading CIFS implementation by using Samba.

  • Urban 01:45 on 30 Sep. 2011 Permalink |  

    A better home server 

    I’ve written about my small and green home server before. I love its low power consumption, integrated UPS/keyboard/screen and the small size.

    But it was time for an upgrade — to a real server.
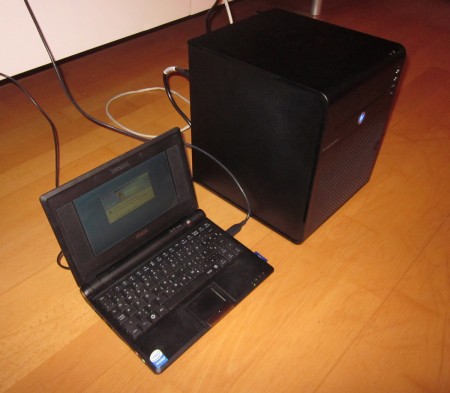
    Size comparison: HP Microserver vs. Asus EEE


    The reasons for an upgrade

    The thing I missed most was more CPU power. The 600 MHz Celeron CPU got pretty bogged down during writes due to NTFS compression. With more and more concurrent writes, the write performance slowed down to a crawl.

    Then there was a shortage of RAM. 1 GB is enough for a single OS, but I’m kind of used to virtualizing stuff. I wanted to run some VMs.

    Also, I’ve been reading a lot about data integrity. This was supposed to be my all-in-one central data repository, but was based on cheap hardware with almost no data protection at all:

    • My single drive could easily fail; it would be nice to have two in a mirror (also, not USB).
    • Bits can randomly and silently flip without leaving any detectable signs (the infamous bit rot).
    • Memory corruption does happen (failing memory modules) and more, bits in RAM flip significantly more often (memory bit rot or soft errors) than on hard drives.

    So what I wanted to combat these problems was:

    • a server that’s still as small, as silent and as green as possible;
    • has a more decent CPU and plenty of RAM;
    • supports ECC RAM (stands for error correcting);
    • and can accomodate an OS with native ZFS file system.


    Why worry about data integrity all of a sudden?

    Well, they say the problem’s always been there: bit error rate of disk drives has been almost constant since the dawn of time. On the other hand, disk capacity doubles every 12-18 months.

    This loosely translates to: there’s an unnoticed disk error every 10-20TB. Ten years ago one was unlikely to reach that number, but today you only need to copy your 3TB Mybook three times and you’re likely to have some unnnoticed data corruption somewhere. And in 5-7 years you’ll own a cheap 100TB drive full of data.

    Most of today’s file systems were designed somewhere in the 1980s or early 1990s at best, when we stored our data on 1.44MB floppies and had no idea what a terabyte is. They continue to work, patched1 beyond recognition, but they were not really designed for today’s, let alone tomorrow’s disk sizes and payloads.


    Enter ZFS

    ZFS is hands down the most advanced file system in the world. Add to that some other superlatives: the most future proof, enterprise-grade and totally open-source. Its features put any other FS to shame2:

    • it includes a LVM (no more partitions, but storage pools),
    • ensures data integrity by checksumming every block of data, not just metadata,
    • automatically corrects data (for this, you need 2 copies of it — that’s why you need a mirror or copies=N setting with N>1)
    • compresses data (with up to gzip-9), which is extremely useful for archival purposes and also speeds up reads
    • supports on-the-fly deduplication (more info here),
    • has efficient and fast snapshotting,
    • can send filesystems or their deltas to another ZFS or to a file, and re-apply them back,
    • can seamlessly utilize hybrid storage model (cache most used data in RAM, and a little less used data on SSD), which means it’s blazingly fast3,
    • integrates iSCSI, SMB (in the FS itself), supports quotas, and more.

    Of course ZFS can use as much ram as possible for cache, plus about 1GB per 1TB of data for storing deduplication hashes. And since the integrity of data is ensured on the drive, it would be a shame for it to get corrupted in RAM (hence, ECC RAM is a must).


    The setup

    Getting all this packed inside a single box looked like an impossible goal — until I found the HP Proliant Misroserver. You can check the review that finally convinced me below.

    The specs are not stellar, but it provides quite a bang for the buck4.

    • It’s a nice and small tower of 27 x 26 x 21 cm with 4 externally accessible drive bays and ECC RAM support;
    • CPU is arguably its weakest point: Dual-core AMD N36L (2x 1.3 GHz); however, the obvious advantage of AMD over Atoms is ECC support;
    • It includes a 250GB drive and 1GB ram, but I’ve upgraded that.
    • upgrade 1: 2x 4GB of ECC ram; as I said, ECC is a must for a server, where a bit flip in memory can wreak havoc in a file system that is basically a sky-high stack of compressed and deduplicated snapshots.
    • upgrade 2: 2x 2TB WD green; it’s energy efficient and can be reprogrammed to avoid aggressive spin-downs.
    • All together, the server loaded with 3 drives consumes only 45W. It’s not silent, but it’s pretty quiet.

    Here’s a quick rundown of what I’ve done with it, mostly following this excellent tutorial (but avoiding the potentially dangerous 4k sector optimization):

    • I installed Nexenta Core, which is a distro combining Solaris kernel with Ubuntu userland. I’ve read many good things about it and find it more intuitive and lean than Solaris.
    • Note: as Nexenta currently doesn’t support booting from a USB key, I had to use an external CD drive, which I hacked from a normal CD drive and an IDE-to-USB cable.
    • I reconfigured WD Green HDDs to disable frequent spindowns.
    • But: I avoided fiddling with the zpool binary from the tutorial above because it can cause compatibility issues and data loss and brings little improvement.
    • I finally added the excellent napp-it web GUI for basic web management. This comes pretty close to a home NAS appliance with the geek factor turned up to 11. You can monitor and control pretty much everything you wish (see below for a screenshot).
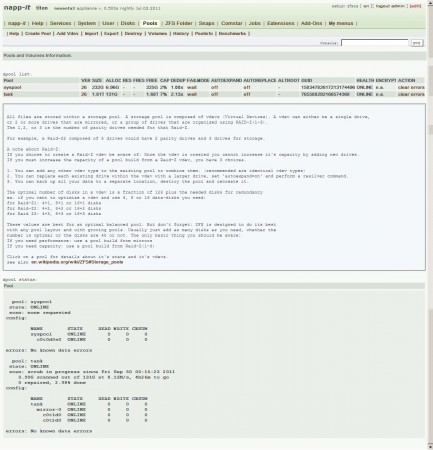
    Napp-it web GUI -- pool statistics

    I configured two drives as a mirrored pool and created a bunch of filesystems in it. A ZFS filesystem is quite analogous to a regular directory and you can have as many filesystems (even nested ones) as you wish. Each separate ZFS can have individual compression, deduplication, sharing and mount point settings (however, deduplication itself is pool-wide).

    Just for feeling, the deduplication and compression at work: with about 630GB of data currently on it (of which there’s about 500GB of Vmware backup images of three servers), the actual space occupied is 131 GB.

    urban@titan:~$ zpool list
    NAME      SIZE  ALLOC   FREE    CAP  DEDUP  HEALTH  ALTROOT
    syspool   232G  6.96G   225G     2%  1.00x  ONLINE  -
    tank     1.81T   131G  1.68T     7%  2.13x  ONLINE  -

    If we look at zpool debugger stats about compression and deduplication, we see there’s a lot of both going on:

    urban@titan:~$ sudo zdb -D tank
    DDT-sha256-zap-duplicate: 695216 entries, size 304 on disk, 161 in core
    DDT-sha256-zap-unique: 1122849 entries, size 337 on disk, 208 in core
    
    dedup = 2.13, compress = 2.04, copies = 1.00, dedup * compress / copies = 4.35


    From here on

    So far I’ve been more than satisfied. I’ve written about deduplication before, and this here is by far the most elegant and robust solution. Of course there’s a bunch of stuff to do next.

    The first one is virtualization, and here my only option (this being a Solaris kernel) is Virtualbox. Until now I’ve sworn by Vmware, but image conversion is actually pretty straightforward (using the qemu-img tool).

    The first candidate for virtualization will be my old EEE, because I still need Windows for running a couple of Windows-only services. The virtual EEE should also be able to mount the ZFS below, either via SMB or iSCSI (Microsoft does provide free iSCSI initiator which I’ve successfully used before), which should ensure smooth transition to the new server.

    1. look at how FAT32 added long file names to see what I mean. []
    2. for detailed FS feature comparison check Wikipedia []
    3. check here: http://www.anandtech.com/show/3963/zfs-building-testing-and-benchmarking/8, but look at OpenSolaris curve; Nexenta here stands for NexentaStor appliance, which is a commercial product. Open-source Nexenta Core actually beats both NexentaStor and OpenSolaris. []
    4. Its current price is mere 169 EUR at very customer-friendly hoh.de. []
     
c
Compose new post
j
Next post/Next comment
k
Previous post/Previous comment
r
Reply
e
Edit
o
Show/Hide comments
t
Go to top
l
Go to login
h
Show/Hide help
shift + esc
Cancel