Updates from September, 2011 Toggle Comment Threads | Keyboard Shortcuts

  • Urban 01:45 on 30 Sep. 2011 Permalink |  

    A better home server 

    I’ve written about my small and green home server before. I love its low power consumption, integrated UPS/keyboard/screen and the small size.

    But it was time for an upgrade — to a real server.

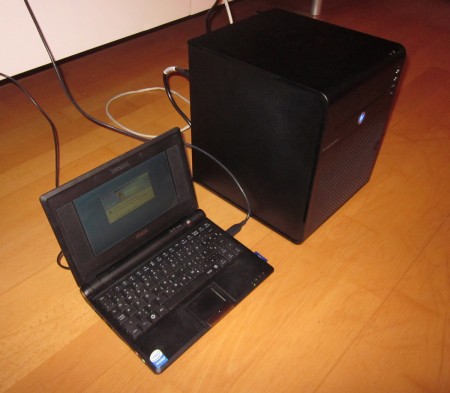
    Size comparison: HP Microserver vs. Asus EEE


    The reasons for an upgrade

    The thing I missed most was more CPU power. The 600 MHz Celeron CPU got pretty bogged down during writes due to NTFS compression. With more and more concurrent writes, the write performance slowed down to a crawl.

    Then there was a shortage of RAM. 1 GB is enough for a single OS, but I’m kind of used to virtualizing stuff. I wanted to run some VMs.

    Also, I’ve been reading a lot about data integrity. This was supposed to be my all-in-one central data repository, but was based on cheap hardware with almost no data protection at all:

    • My single drive could easily fail; it would be nice to have two in a mirror (also, not USB).
    • Bits can randomly and silently flip without leaving any detectable signs (the infamous bit rot).
    • Memory corruption does happen (failing memory modules) and more, bits in RAM flip significantly more often (memory bit rot or soft errors) than on hard drives.

    So what I wanted to combat these problems was:

    • a server that’s still as small, as silent and as green as possible;
    • has a more decent CPU and plenty of RAM;
    • supports ECC RAM (stands for error correcting);
    • and can accomodate an OS with native ZFS file system.


    Why worry about data integrity all of a sudden?

    Well, they say the problem’s always been there: bit error rate of disk drives has been almost constant since the dawn of time. On the other hand, disk capacity doubles every 12-18 months.

    This loosely translates to: there’s an unnoticed disk error every 10-20TB. Ten years ago one was unlikely to reach that number, but today you only need to copy your 3TB Mybook three times and you’re likely to have some unnnoticed data corruption somewhere. And in 5-7 years you’ll own a cheap 100TB drive full of data.

    Most of today’s file systems were designed somewhere in the 1980s or early 1990s at best, when we stored our data on 1.44MB floppies and had no idea what a terabyte is. They continue to work, patched1 beyond recognition, but they were not really designed for today’s, let alone tomorrow’s disk sizes and payloads.


    Enter ZFS

    ZFS is hands down the most advanced file system in the world. Add to that some other superlatives: the most future proof, enterprise-grade and totally open-source. Its features put any other FS to shame2:

    • it includes a LVM (no more partitions, but storage pools),
    • ensures data integrity by checksumming every block of data, not just metadata,
    • automatically corrects data (for this, you need 2 copies of it — that’s why you need a mirror or copies=N setting with N>1)
    • compresses data (with up to gzip-9), which is extremely useful for archival purposes and also speeds up reads
    • supports on-the-fly deduplication (more info here),
    • has efficient and fast snapshotting,
    • can send filesystems or their deltas to another ZFS or to a file, and re-apply them back,
    • can seamlessly utilize hybrid storage model (cache most used data in RAM, and a little less used data on SSD), which means it’s blazingly fast3,
    • integrates iSCSI, SMB (in the FS itself), supports quotas, and more.

    Of course ZFS can use as much ram as possible for cache, plus about 1GB per 1TB of data for storing deduplication hashes. And since the integrity of data is ensured on the drive, it would be a shame for it to get corrupted in RAM (hence, ECC RAM is a must).


    The setup

    Getting all this packed inside a single box looked like an impossible goal — until I found the HP Proliant Misroserver. You can check the review that finally convinced me below.

    The specs are not stellar, but it provides quite a bang for the buck4.

    • It’s a nice and small tower of 27 x 26 x 21 cm with 4 externally accessible drive bays and ECC RAM support;
    • CPU is arguably its weakest point: Dual-core AMD N36L (2x 1.3 GHz); however, the obvious advantage of AMD over Atoms is ECC support;
    • It includes a 250GB drive and 1GB ram, but I’ve upgraded that.
    • upgrade 1: 2x 4GB of ECC ram; as I said, ECC is a must for a server, where a bit flip in memory can wreak havoc in a file system that is basically a sky-high stack of compressed and deduplicated snapshots.
    • upgrade 2: 2x 2TB WD green; it’s energy efficient and can be reprogrammed to avoid aggressive spin-downs.
    • All together, the server loaded with 3 drives consumes only 45W. It’s not silent, but it’s pretty quiet.

    Here’s a quick rundown of what I’ve done with it, mostly following this excellent tutorial (but avoiding the potentially dangerous 4k sector optimization):

    • I installed Nexenta Core, which is a distro combining Solaris kernel with Ubuntu userland. I’ve read many good things about it and find it more intuitive and lean than Solaris.
    • Note: as Nexenta currently doesn’t support booting from a USB key, I had to use an external CD drive, which I hacked from a normal CD drive and an IDE-to-USB cable.
    • I reconfigured WD Green HDDs to disable frequent spindowns.
    • But: I avoided fiddling with the zpool binary from the tutorial above because it can cause compatibility issues and data loss and brings little improvement.
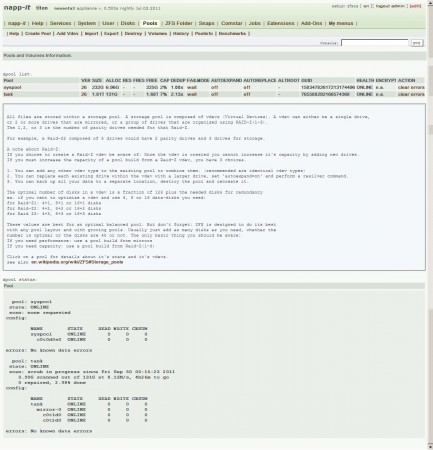
    • I finally added the excellent napp-it web GUI for basic web management. This comes pretty close to a home NAS appliance with the geek factor turned up to 11. You can monitor and control pretty much everything you wish (see below for a screenshot).

    Napp-it web GUI -- pool statistics

    I configured two drives as a mirrored pool and created a bunch of filesystems in it. A ZFS filesystem is quite analogous to a regular directory and you can have as many filesystems (even nested ones) as you wish. Each separate ZFS can have individual compression, deduplication, sharing and mount point settings (however, deduplication itself is pool-wide).

    Just for feeling, the deduplication and compression at work: with about 630GB of data currently on it (of which there’s about 500GB of Vmware backup images of three servers), the actual space occupied is 131 GB.

    urban@titan:~$ zpool list
    NAME      SIZE  ALLOC   FREE    CAP  DEDUP  HEALTH  ALTROOT
    syspool   232G  6.96G   225G     2%  1.00x  ONLINE  -
    tank     1.81T   131G  1.68T     7%  2.13x  ONLINE  -

    If we look at zpool debugger stats about compression and deduplication, we see there’s a lot of both going on:

    urban@titan:~$ sudo zdb -D tank
    DDT-sha256-zap-duplicate: 695216 entries, size 304 on disk, 161 in core
    DDT-sha256-zap-unique: 1122849 entries, size 337 on disk, 208 in core
    
    dedup = 2.13, compress = 2.04, copies = 1.00, dedup * compress / copies = 4.35


    From here on

    So far I’ve been more than satisfied. I’ve written about deduplication before, and this here is by far the most elegant and robust solution. Of course there’s a bunch of stuff to do next.

    The first one is virtualization, and here my only option (this being a Solaris kernel) is Virtualbox. Until now I’ve sworn by Vmware, but image conversion is actually pretty straightforward (using the qemu-img tool).

    The first candidate for virtualization will be my old EEE, because I still need Windows for running a couple of Windows-only services. The virtual EEE should also be able to mount the ZFS below, either via SMB or iSCSI (Microsoft does provide free iSCSI initiator which I’ve successfully used before), which should ensure smooth transition to the new server.

    1. look at how FAT32 added long file names to see what I mean. []
    2. for detailed FS feature comparison check Wikipedia []
    3. check here: http://www.anandtech.com/show/3963/zfs-building-testing-and-benchmarking/8, but look at OpenSolaris curve; Nexenta here stands for NexentaStor appliance, which is a commercial product. Open-source Nexenta Core actually beats both NexentaStor and OpenSolaris. []
    4. Its current price is mere 169 EUR at very customer-friendly hoh.de. []
     
  • Urban 23:39 on 31 Jul. 2011 Permalink |  

    Skip Trash in Lion 

    One of the things that bothers me in Mac OS X is that you cannot delete files without skipping the trash (apart from using the console). This means that to free the disk space of, say, a 2GB file, you have to empty the trash; if you delete large files often, your trash either grows very large or you empty it so often, that it defeats the very purpose of having one.

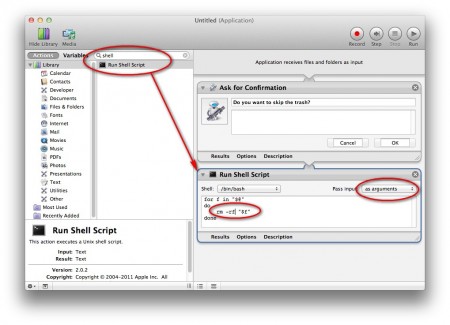
    Until now I’ve used a handy script/droplet Permanently shred, but it broke in Lion. So here’s how you make your own “Skip Trash” dock app using Automator.

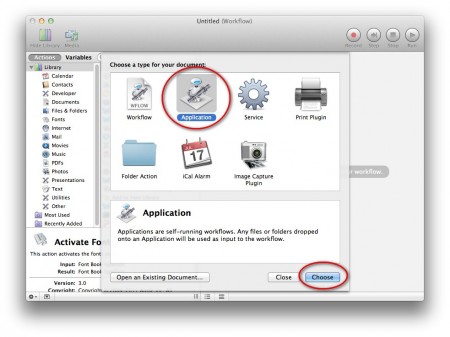
    1. Start Automator
    2. Choose “Application”


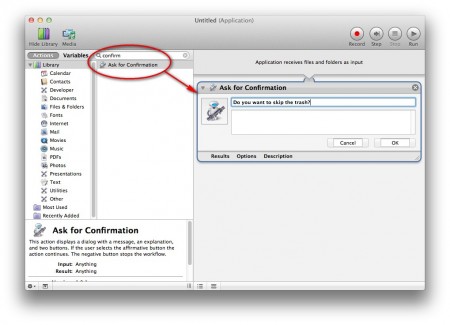
    3. Search for “Ask for confirmation” and drag it to the right pane
    4. Enter a confirmation message, e.g. “Are you sure?”

    5. Search for “Run shell script” and drag it to the right pane
    6. Select “Pass input: as arguments”
    7. Replace “echo” with “rm -rf”

    8. Save application (e.g. as SkipTrash.app)
    9. drag it to the dock and select “Options -> keep in dock”

    If you want the app to play a Poof sound when finished, add “afplay /Library/poof.aif” at the end of the shell script and unzip and copy this file to your /Library/ (or any other location you want, but update the path accordingly): poof.aif.zip

    So now whenever you want to skip the trash, drop files or folders onto the newly created SkipTrash.app instead of the regular Trash icon.

     
    • Taoiste 02:41 on 9 Sep. 2011 Permalink

      Works great, thanks, but with only one file at a time.
      I’m trying to figure out how to prevent Lion from asking “Run anyway, because it’s from internet…”

    • Urban 17:25 on 9 Sep. 2011 Permalink

      It should work for more than one file.. make sure you’ve selected “pass input as arguments” and put the rm -rf inside the *for loop*.
      If the soundfile’s giving you problems, you can just omit it. Otherwise, try something like this to disable warnings: 
      https://discussions.apple.com/thread/3216314?start=0&tstart=0 

    • Urban 17:26 on 9 Sep. 2011 Permalink

      It should work for more than one file.. make sure you’ve selected “pass input as arguments” and put the rm -rf inside the *for loop*.

      If the soundfile’s giving you problems, you can just omit it. Otherwise, try something like this to disable warnings: 
      https://discussions.apple.com/thread/3216314?start=0&tstart=0 

    • Taoiste 18:17 on 9 Sep. 2011 Permalink

      Typed in terminal: defaults write com.apple.LaunchServices LSQuarantine -bool NO
      Now it works now with more than one file. Thanks alot!

    • robotwholearned 17:18 on 8 Jun. 2012 Permalink

      Thank you, this works great!

  • Urban 23:54 on 11 Jul. 2011 Permalink |  

    Server status via SMS 

    Stormy weather makes me worried about my electronic equipment, especially servers. A summer storm can take out power, corrupt a HDD in the process, or in the worst case, fry absolutely everything by a strategically placed lightning strike.

    But even on a quiet winter day, hard disk can quietly fill with logs, one byte at a time, finally causing a bunch of services to die (I’m looking at you, Mysql).

    The point is, anything can happen and you have to check often to prevent an unplanned downtime, which can sometimes extend significantly because no-one checked1. And checking gets more tedious the more stuff you have. So this post describes a quick&dirty method, tailored to my needs, on the cheap.

    A quick disclaimer: I do know about Pingdom and similar services, as well as Nagios. However, I wanted a simple lightweight script, which runs on my home server behind a firewall, and queries my public servers over HTTP. Then it sends me a text, once daily.

    This is how it works:

    • my home server acts as an agent and tries to contact all the public servers
    • each server performs a quick and dirty on-demand self-test, responding with a message that reports the available disk space, mysql status, etc.
    • python script on the home server aggregates all the responses into a concise form, suitable for texting
    • and sends it, once a day.

    To test the public servers, I created a simple PHP script which performs some basic tasks a healthy server should be able to do, and returns a response. This is the version 1:

    
    A<?php
        /*A stands for Apache.
          If only "A" gets served,
          the web server is alive, but PHP doesn't work. */
     
        /*print P (short for PHP OK),
          followed by GBs of free disk space */
        echo "P[" . floor(disk_free_space("/") / 1024 / 1024 / 1024) . "G]";
    
    
        /*try connecting to MySQL */
        mysql_connect("server", "user", "pass")
            or die("db_down");
        mysql_select_db("mysql")
            or die("db_err");
      
        /*Print a short string ("My") through the
          database to prove it works.*/
        $res = mysql_query("select 'My' as my from user");
        $row = mysql_fetch_assoc($res);
        echo $row["my"];
    
    
        /*if everything works ok, this should
          return something like AP[10G]My
          which simply means apache works ok,
          php interpreter is fine,
          there's 10G of free disk
          and mysql is fine. */
    ?>


    I wanted to get this summary delivered as a SMS notification. Twillio looked promising, but in the end wouldn’t take my CC, so I used this awesome hack to send free text in the form of a Google Calendar reminder.

    I extended the provided Python script to also get the free disk space of my home server and wrap everything up as a single SMS. The result looks something like this:

    Reminder: srv1_ok! c:1018M d:709054M srv2:AP[10G]My srv3:AP[2G]My

    This was at first meant to be just a form of “infrastructure unit test”, returning true if everything checks out OK, and false otherwise. But since there was room for additional info, I added more to fill the message.

    I’ve been somewhat reluctant to set up different notifications in the past, because that basically means more spam. But since I did it once at work (via e-mail), it’s been quite satisfying. An e-mail with the subject “Everything ok!” makes my day, and that’s what I get most of the time anyway.

    1. It’s just recently happened to me 🙂 []
     
  • Urban 02:04 on 20 May. 2011 Permalink |  

    Dr. Strangelove endorses our app 

    It appears that Dr. Strangelove in the movie with the same title1 also uses the Nuclear Bomb Effects Computer slide rule in a scene or two. I just spotted it (and I have proof: see two screen grabs below, around 01h25 in the movie).

    So now I can add a tagline to Nuke Effects: As seen in Dr. Strangelove.


    1. that is, Dr. Strangelove or: How I Learned to Stop Worrying and Love the Bomb, 1964 []
     
  • Urban 14:02 on 14 May. 2011 Permalink |  

    Nuke Effects for iPad 

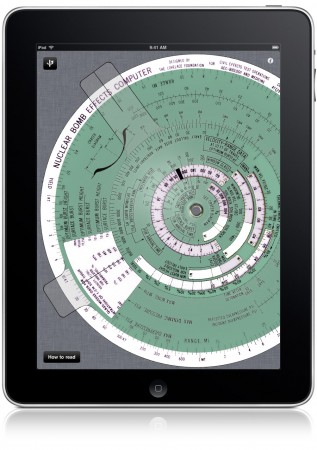
    Nuke Effects, an iPad version of the once famous Nuclear Bomb Effects Computer just hit the App Store.

    From the Nuke Effects description:

    ~~~~~~~~~~~~~~~~~~~~~~~~~~~~~~

    In 1960s, when the Cold War was at its peak and the world’s two superpowers were locked in a nuclear arms race, the U.S. Government Printing Office published a handy slide rule for estimating the effects of nuclear weapon explosions. It was available for $1.00 to anyone interested in “the study of effects data derived from nuclear weapons tests and from experiments designed to duplicate various characteristics of nuclear weapons”.

    Since then, many things have changed and this slide rule remains a relic of the past. Having become a collector’s item, it is only available for a handy sum on auction sites and as a rather impractical web-based version. Until now.

    This app is a faithful (although—for greater ease of reading—somewhat oversized) digital replica of the real thing. By responding to your touch much like the original plastic version, it brings this museum piece back to life.

    With it you can evaluate 28 different effects of nuclear weapons, of which 13 relate to blast, 5 to thermal radiation, 1 to initial nuclear radiation, 2 to early fallout, 6 to crater dimensions, and 1 to fireball dimensions. Most of the parameters are presented as functions of range and yield.

    The original slide rule was based on a book “The effects of nuclear weapons”. This hefty 700+ page publication (which is in public domain, as well as the slide rule itself) is available at the support site of this app, together with links to the resources used to create this app.

    ~~~~~~~~~~~~~~~~~~~~~~~~~~~~~~

    This app is free (as in free beer). It was inspired by the Trigonir iPad App of my good colleague Dragan and by the web version of the slide rule at Fourmilab. The app was created using the materials, generously provided on the Fourmilab website, which you can also use to build your own paper&plastic version.

     
c
Compose new post
j
Next post/Next comment
k
Previous post/Previous comment
r
Reply
e
Edit
o
Show/Hide comments
t
Go to top
l
Go to login
h
Show/Hide help
shift + esc
Cancel