Updates from Urban Toggle Comment Threads | Keyboard Shortcuts

  • Urban 23:04 on 27 Mar. 2012 Permalink |  

    Gravity Lab update: now in 3D 

    This update has long been in the making and it finally makes Gravity Lab what it was meant to be. Namely, a gravity simulator with 3D display of gravity potential. Take a look (click for larger image).

    However, a point must be made for the scientifically inclined: the “gravity well” is not completely accurate due to usability reasons. Let me explain.

    The sizes of the celestial bodies (I’m especially referring to the solar system preset) are not exactly true to scale. You see, if they were you couldn’t see them. The distances involved are so large compared to the sizes of the planets and the Sun, that they’d be sub-pixel-sized (even on iPad3 with retina screen) if the solar system was to fit the screen. You can check their true sizes with an app like Solar Walk (or simply google it).

    So I had to cheat a little and inflate the planets so we can see them. But this came back to bite me when drawing the mesh. The reason is that the gravity potential obeys different laws inside vs. outside of an object. Namely, outside of an object the gravitational pull is inversly proportional to the square of the distance from the center of mass, while inside the object it changes linearly with the distance from the center.

    So I had two choices: represent each body basically as a point mass (that would kind of resemble a black hole when zoomed out) which would produce extremely steep wells spiking out of screen and out of sight, or cheat again and try to approximate (smooth) them with a more friendly function. I chose the latter.

     
  • Urban 23:27 on 7 Feb. 2012 Permalink |  

    How not to photograph a Venus transit 

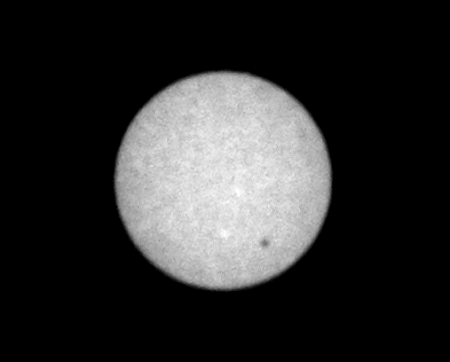
    As it happens, on June 6 2012 we’ll have another one of those rare Venus transits. This means that the Venus will pass directly in front of the Sun, similarly to an eclipse (however, Venus is so small you won’t even notice it without special equipment).

    This is the second transit in the last 8 years, and after that, we won’t get another one for over 100 years. To get a feeling, these are the showtimes:

    • 1761 & 1769
    • 1874 & 1882
    • 2004 & 2012
    • 2117 & 2125

    This year’s transit will unfortunately just be finishing when the sun rises where I live, so there won’t be much of a chance of taking pictures. However, stumbling upon that info I remembered that I actualy took pictures of the 2004 transit. Yaay!

    Now, 2004 was quite different in terms of technology. I owned an entry level digital camera (this one), poorly suited for such a task. (We’ve indeed come quite far in the last 8 years, with all the iPhones and Lytros and Angry Birds; I wonder what kind of tech they’ll have for the next one in 2117).

    Instead, I had decided to use my father’s film camera — a Praktica PLC3 with a 200mm lens. I covered it with mylar film and shot blind. Blind as in “not being able to see my results and try out different exposures on the fly.” That’s the main reason the photos suck: I overexposed them all.

    It took me some time to find the film.

    I found it last week — still in the camera, after 8 years (and as it turns out, after Kodak went belly-up).

    I’ve had it developed and scanned; all pictures were heavily overexposed (I guess the average metering threw me off; luckily, the film has broader exposure latitude than digital sensors and some details remained and could be recovered using postprocessing).

    As if that were not enough, the mylar film made a nasty halo on almost every one of them. 8 years in the camera didn’t help either, so the grain’s pretty awful (although I chose the ISO 100 for the exact reason of minimising grain).

    So this is it: two of the best pics; the first one of ingress, and the other one, somewhere in the middle.

    All in all, not that bad for film that’s been through so much. But a far cry from what I’d expected. The following picture is from Wikipedia and is awfully crisp. That’s because the original is a couple of times bigger, while my pics above are shown in actual size (scanned from film at 14 MPix).

    Note to self: next time use a telescope.

     
  • Urban 14:08 on 15 Jan. 2012 Permalink |  

    Subtitlr retires 

    The agony has gone on long enough: from an idea in 2006, to a proof of concept in mid-2007, a business plan and a hopes of a start-up (under the name of Tucana, d.o.o.) in 2008, directly to the dustbin of history.

    I’ve just pulled the plug and shut it down.

    Its ideas were good: a wikipedia-inspired revision based subtitling and subtitle translation service, which would help spread the knowledge in the form of flash-based videoclips. It’s been obsoleted by other projects with more traction, such as DotSub and TED translations (incidentally, most of the clips I was inspired by and wanted to share with people, whose first language was not English, came from the TED itself). Now that Youtube’s language recognition and Google’s machine translation have gotten much better, there’s less and less need for painstaking transcription and all the manual work.

    If I had to choose one thing to blame for its lack of success, underestimating the difficulty of transcribing video would be it. It literally takes hours to accurately transcribe a single clip, which is no longer than a couple of minutes.

    I’ve tried rebranding and repurposing it into a Funny clip subtitler and at least got some fun and local enthusiasm out of that. However, it’s all a part of one big package which now needs closure.

    Some ideas I’ve had were never implemented, although I thought they had great potential; I wanted to bring together large databases of existing movie and TV show subtitles with the publicly available video content in Flash Video. Since at the time almost all video on the web was FLV, there was no technological barrier. And there’s still a lot of popular TV shows, movies, etc, burried deeply in the video CDNs (Youtube, Megavideo, Megaupload), and large databases of “pointers” are maintained and curated by different communities (Surfthechannel.com, Icefilms.info). Having the video and the subtitle available instantly, without the cost of hosting large files, was a textbook Mash-up idea.

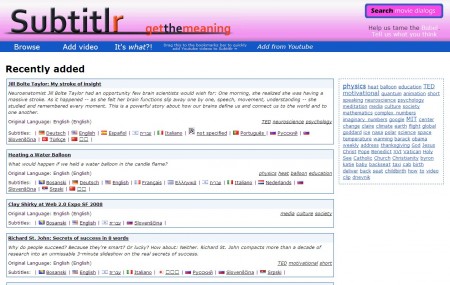
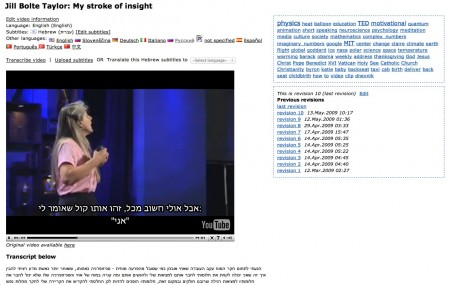
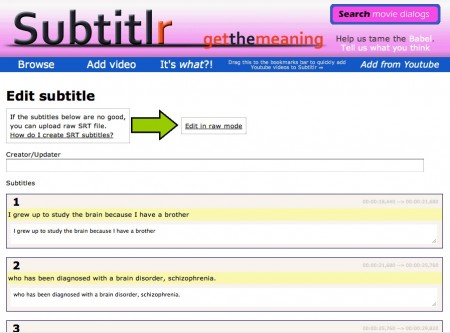
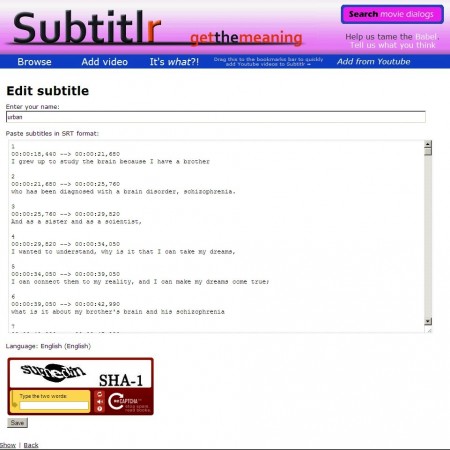
    I’m posting some screenshots below, for the future me, so I can remember what I was spending countless hours of my time on. Yes, the design’s ugly, but bear in mind it was all a work of one man, eager to add functionality, and pressed into kickstarting the content generation by also transcribing and translating a bunch of videos.

    Thanks to all who shared the enthusiasm and helped in any way.

    Main page


    Video page


    Subtitle translation

    Rebranded as a Hitler-parody subtitle editor


  • Urban 02:01 on 9 Jan. 2012 Permalink |  

    Some notes on Nexenta/ZFS 

    So far I’ve been pretty satisfied with my Nexenta setup. Dedup is a great feature and I’ve rsynced all other computers to it without a single thought of which files are copied more than once (all Windows and program files, multiple copies of pictures, multiple copies of Dropbox dirs, etc.). However, the following three things drove me nuts; here’s a word on how I’ve resolved them.


    Smbshare vs. Samba

    Yes, native ZFS smbshare is great; it even exposes snapshots as “Previous versions” to Windows boxes. And it can be simply managed from napp-it. However, smbshare won’t allow you to share the file system’s children 🙁

    Here’s how this works: let’s say you have 3 nested file systems:

    • mypool/data
    • mypool/data/pictures
    • mypool/data/pictures/vacation

    When you share mypool/data and navigate to it, you won’t see the pictures dir. When you navigate to pictures, you won’t see the vacation dir.

    It drove me crazy and it seems it won’t be supported anywhere in the near future. That’s why I disabled smbshare completely and installed plain old Samba. Because Samba’s not ZFS-aware (but instead a plain old app that accesses the file system) it shares everything as you’d expect. Problem solved.


    Backing up an entire zpool

    I wanted the following:

    • to backup the entire data pool to an external USB drive of the same capacity (2TB)
    • a solution that would be smart enough to recognize matching snapshots and only copy the diffs
    • it should also delete the destination snaps that no longer exist in the source pool
    • it wouldn’t hurt if it supported remote replication in case I wanted that later

    Much has been written about the awesomeness of zfs send | zfs receive, but I was immediately disappointed by all the manual work that still needed to be done. Sure, it supports recursive send/receive, it can be used over ssh, but it only operates on snapshots. It can incrementally copy the last delta (if you tell it exactly which two snapshots are to be used for diff), but if you prune your old snapshots to save space, it won’t know anything about that. So your backup size will grow indefinitely, constantly appending more data.

    What I wanted was a simple 1:1 copy of my pool to an external drive. I even considered adding the drive to the mirror to create a 3-way mirrored pool; once resilvering would complete, I could split the mirror and disconnect the USB drive. However, resilvering is not that smart and takes days; all the data needs to be copied every time, and making a snapshot interrupts and restarts the process.

    Then I found the excellent zxfer. It does work on Nexenta and allows you to mirror an entire pool; the procedure is pretty straightforward: first determine the path of your external USB drive using rmformat:

    #rmformat

    1. …
    2. Logical Node: /dev/rdsk/c3t0d0p0
    Physical Node: /pci@0,0/pci103c,1609@12,2/storage@3/disk@0,0
    Connected Device: WD 20EADS External 1.75
    Device Type: Removable
    Bus: USB
    Size: 1907.7 GB
    Label: <Unknown>
    Access permissions: Medium is not write protected.

    Then create your USB drive backup pool:

    zpool create Mybook-USB-backupzpool /dev/rdsk/c3t0d0

    Finally, recursively backup your entire data zpool (here we set the target to be compressed with gzip-5 and deduped with sha256,verify)

    zxfer -dFkPv -o compression=gzip-5,dedup=verify -R sourcezpool Mybook-USB-backupzpool

    On subsequent runs it identifies the last common snapshot and copies only the diffs. [-d] switch deletes pruned snapshots from the target pool. For more, read the zxfer man page.


    Virtualbox

    This has been pretty disappointing; it’s a pain to set it up and it performs badly (that is, compared to VmWare on similar hardware). It burns around 15% of the CPU running an idle and freshly installed Ubuntu box. Command-line config is a pain and virtualizing (P2V) certain Windows boxes spits out errors that (according to Google) noone has ever seen before. The same image Just Works ™ under VmWare.

    Nonetheless, it’ll have to do for now. For more info on how to set it up, consult the following:

     
    • Gea 23:33 on 12 Jan. 2012 Permalink

      about SMB
      There are efforts to solve this problem.
      Currently: Each ZFS dataset is completely independant from others. You can set a mountpoint to mount the logically below others. But you cannot SMB browse between because they cannot inherit properties.

      Workaround: use one share

      about zfs send
      the target does not increase. its always an exact copy of the source including all volumes and snaps. Transfers are based on modified data blocks so its more efficient than file based methods

      About Virtialbox
      Why do you try to virtualize on top of OS when you need performance. Use a barebone virtualizer like ESXi instead and virtualize all OS’s including a ZFS NAS/SAN
      look at napp-it all-in-one

    • Urban 15:58 on 15 Jan. 2012 Permalink

      Hey, thanks for your elaborate comment.
      Regarding SMB, I think Samba is a pretty decent workaround as well; as far as I can tell, all you lose is “previous versions”.

      About zfs send: my understanding is that only the diff between two snaps is sent, while older snaps are left intact (I did in fact check that).
      Let’s say I have a weekly snapshot schedule and only want to keep 5 snaps. After a snap, I also send the incremental diff to the USB drive. In week 5, I still have two identical filesystems. However, in week 6 I make snap6 and destroy snap1; then I send delta (-i) between snap5 and snap6 to external drive. Now drive 1 has snaps 2-6 and drive 2 has snaps 1-6. This is not what I want, since drive 2 grows in size compared to drive 1. 

      Regarding Vbox: thanks for the tip, I’ll definitely try the all-in-one solution.

    • jaymemaurice 06:01 on 22 Dec. 2013 Permalink

      Old post – but you also lose out on a great multi-threading CIFS implementation by using Samba.

  • Urban 03:17 on 15 Nov. 2011 Permalink |  

    Moving Nexenta from HDD to USB stick 

    I wanted this because the 7200 RPM disk that shipped with HP Microserver makes an annoying metallic noise when spinning. USB key is quieter, greener and frees an additional disk bay. Also, Microserver has an extra USB slot inside the chasis just for this purpose.

    However, the operation was not as simple as I thought1 — because you can’t shrink zpools (that is, shrink from the 250GB internal drive to the 16GB USB drive).

    So I had two options: reinstall from scratch and choose USB stick as the target, or move the existing system. I chose the latter to avoid the reconfiguration. However, if you haven’t installed it yet and are thinking about this as a future upgrade path, I recommend you skip the HDD entirely and go directly to USB stick; it will save you a lot of trouble.

    In the end, this process worked:

    • Install Nexenta (fresh install) on USB key (I did this using VMWare and USB passthrough). This creates suitable partition table, installs grub and saves many other steps as well.
    • Boot the old system (disable usb boot) and plug in the USB stick.
    • Import new zpool on the usb stick as newsyspool (to distinguish from old syspool).
    • Delete all filesystems in newsyspool using zfs destroy newsyspool/dump (also: newsyspool/swap, newsyspool/nmu… everything); this deletes all data on the USB drive — we just need partitions (i.e., ZFS slices).
    • Make a recursive snapshot of the old (internal HDD) syspool: zfs snapshot -r syspool@20111112
    • Copy entire internal HDD (i.e., syspool) to the USB stick: zfs send -R syspool@20111112 | zfs recv -vFd newsyspool
    • Set boot property of the USB drive in the same way than that of your internal HDD. Get the latter with zpool get bootfs syspool (this shows old bootfs property, e.g., syspool/rootfs-nmu-000). Then set the former (newsyspool on USB drive) with zpool set bootfs=newsyspool/rootfs-nmu-000 newsyspool
    • Set noatime=off to disable writing a timestamp on every read: zfs set atime=off newsyspool
    • Disconnect your internal HDD, set bios to boot from USB drive and reboot.
    • If the system doesn’t boot, just reconnect the old drive and you haven’t lost anything.
    • If the system boots, delete the old syspool which is now faulted (since there’s no HDD): zpool destroy syspool (warning, this asks for no confirmation! be sure you’ve booted from USB!)

    I got most of it from these guides:


    Update 2011-12-20:

    About 1 month after the upgrade the USB key failed; the server wouldn’t boot (stuck at grub loading stage2), so I plugged back the old HDD, scrubbed USB key zpool and it found approx. 1000 errors, of which 500 were unrecoverable. It was not the cheapest USB key (PQI), but the constant swapping or whatever Nexenta’s doing when nobody’s looking must have killed it.

    Update 2012-05-15

    Fixed some errors pointed out in the comment.

    1. What I thought was this: plug in the USB stick, create a mirrored syspool and remove the HDD []
     
    • Roland Hordos 20:30 on 15 May. 2012 Permalink

      Thank you!  This worked for me with a couple of tweaks, then some additional (resolved) drama.

      NexentaStor 3.1.2 – SunOS 5.11 NexentaOS_134f 64bit
      Tweak 1 – The snapshot also needs to be recursive or the send/recv will miss most everything# zfs snapshot -r syspool@20100514-2Tweak 2 – The atime statement for me needed to be:# zfs set atime=off newsyspool  I subsequently decided to revert the atime back to “on” which is what the original syspool has, just in case there’s some algorithm foiled by this and inadvertenly causing _more_ writes (perhaps causing your early device failure?)Problem with Licensing – the mucking with the syspool causes the licensing system to get a headache on reboot and wants you to reenter your registration key.  You do but License bully doesn’t like that you’ve changed the syspool name and errors, forcing you to take a bash shell or return to the licensing screen.Solution:* Booted into recovery console* Imported newsyspool as syspool (needs -f)* Rebooted into appliance, licensing bully faked outI imagine a cleaner way to do this but exporting the in use newsyspool first did not seem viable. Cleanup:  so there’s also still a “newsyspool” because it was never exported and now the metadata is a mess from what I did in recovery console with -f.  Newsyspool is ONLINE and healthy whereas “syspool” is degraded.  Despite degraded it is actually in use as running df in bash shows a syspool originating root mount.  So ..* Exported newsyspool so it’s no longer claiming the same device* Cleared errors on syspool as it has it’s device back* Reboot auto repaired a minor checksum error (declared as such)

      Thank you, this freed the initial 1TB drive I used for my syspool on install.  I then went on to mirror the syspool to further protect my blazing fast NexentaStor !

    • Urban 21:48 on 15 May. 2012 Permalink

      Thanks for the comment, your tweaks are actually the right way to do it.. I’ve updated the post to fix the errors 🙂

    • Roland Hordos 16:33 on 16 May. 2012 Permalink

      Cool!  Sorry for the de-formatted mess I made in your post <>

    • Damian Wojsław 09:30 on 15 Jun. 2012 Permalink

      I think there is lots of logging going on during normal operation, so you’d get lots of write cycles. If your appliance is swapping, I’d say that you have too little RAM for normal operation. 🙂

    • araj 17:21 on 13 Dec. 2012 Permalink

      were you able to exactly figure out  what went wrong while using the USB as boot drive. I am trying to setup a nexentastor based NAS with boot from USB 2x16GB-mirrored, and 8GB RAM

      Any input is much appreciated.The area I am most uncertain about is on safely using the USB flash drive as boot disk.

      Thanks

    • Urban 01:55 on 14 Dec. 2012 Permalink

      Unfortunately, no.. I didn’t have the slightest idea how to approach such post-mortem diagnostics. USB flash drives use wear leveling, which makes the entire drive wear out equally (below the level of FS). This makes it next to impossible to isolate the reason after the fact..

      In hindsight, my best guess is swap (as another commenter noted), which should’ve been disabled (duh). I guess I didn’t think swap would get used that much, as the machine had 8 GB of RAM (which should’ve been plenty). 

      Also note that I used Nexenta Core, which is basically “an ordinary linux distro with solaris kernel”. I would think this is not optimized in any way, out-of-the-box. On the other hand, NexentaStor is a ready-made appliance with all kinds of things preconfigured, so it’s very likely a better starting point and might already be tweaked to play better with flash storage.

      All that said, any flash drive you use will still have a limited number of writes and it will most definitely not be sustainable in the long run if there’s stuff being written to it. If you want a bulletproof solution, you need to mount it in readonly mode and move all writable config files, temp dirs and logs to another drive (you can replace originals with symlinks to the new location). This could very easily prove to be more trouble than is’t worth.. 

      Alternatively, you could use a NAS distro that’s already optimized to run in read-only mode from a flash drive, such as FreeNAS.

      Or just use two HDDs (maybe internal + usb). Or even only 1 HDD with copies=2 to protect against soft errors.. depends on what you want to optimize for.

    • araj 15:24 on 14 Dec. 2012 Permalink

       Thanks a lot for the reply and the suggestions will definitely help me.

c
Compose new post
j
Next post/Next comment
k
Previous post/Previous comment
r
Reply
e
Edit
o
Show/Hide comments
t
Go to top
l
Go to login
h
Show/Hide help
shift + esc
Cancel